การติดตั้ง SSL ให้ทำงานบน Web Server
ทำการสร้าง folder ชื่อ ssl-cert ด้วยคำสั่ง mkdir ssl-cert จากนั้นทำการเข้าไปใน folder ด้วยคำสั่ง cd ssl-cert
ทำการติดตั้งโปรแกรม Openssl ด้วยคำสั่ง apt-get install openssl แล้วทำการกด Enter
ทำการแก้ไขไฟล์ Config ด้วยการเข้าไปที่ nano /etc/ssl/openssl.cnf แล้วกด Enter จะปรากฏหน้าต่างนี้
ให้ทำการค้นหาด้วยการใช้กด Ctrl+w เพื่อให้คำสั่งค้นหา แล้วพิมพ์ข้อความที่ต้องการcountryName_default แล้วกด Enter พอเจอแล้วทำการแก้ไขให้เป็น TH แล้ว
ทำการค้นหา stateOrprovinceName เพื่อทำการแก้ไขเป็นค่าว่าง เมื่อแก้ไขเสร็จแล้วทำการ กด Ctrl+Oเพื่อทำการบันทึก แล้วกด Enter แล้วทำการกด Ctrl+X เพื่อเป็นการออกจากการแก้ไข
ทำการสร้าง ไฟล์ Certificate โดยใช้คำสั่ง
Openssl genrsa –out server.key 1024
Certificate Signing Request โดยใช้คำสั่ง
openssl req -config /etc/ssl/openssl.cnf -new -key server.key -out newcsr.csr
ให้กรอกข้อมูลตามนี้
Country Name (2 letter cord) : TH
State or Province Name (Full name)[]:
Locality Name (eg, city)[]:Bangkok
Organization Unit Name(eg, company) [Internet Widgits Pty Lid]:cfsb
Organizational Unit Name (eg, section)[]:cfsb
Common Name (eg, YOUR name) [] : www.cfsb.com
Email Address [] : admin@cfsb.com
สร้างแฟ้มข้อมูล server certificate โดยใช้คำสั่ง
openssl x509 -req -days 365 -in newcsr.csr -signkey server.key -out server.crt
เปิดการใช้งาน Module SSL
เปลี่ยนชื่อFolder โดยใช้คำสั่ง
cp /etc/apache2/sites-available/default /etc/apache2/sites-available/sslsite
ทำการแก้ไขไฟล์ sslsite ดังนี้โดยใช้คำสั่ง
nano /etc/apache2/sites-available/sslsite
NameVirtualHost *:443
<VirtualHost *:443>
ServerName www.cfsb.com:443
ServerAlias www.cfsb.com:443
ServerAdmin admin@cfsb.com
SSLEngine On
SSLCipherSuite ALL:!ADH:!EXPORT56:RC4+RSA:+HIGH:+MEDIUM:+LOW:+SSLv2:+EXP:+eNULL
SSLCertificateFile /ssl-cert/server.crt
SSLCertificateKeyFile /ssl-cert/server.key
เมื่อแก้ไขเสร็จแล้วทำการบันทึกด้วยการกด Ctrl+O แล้วกด Enter แล้วกด Ctrl+X เพื่อออกจากการแก้ไข จากนั้นทำการเปิดการทำงานของ SSLSite ด้วยคำสั่ง a2ensite sslsite
ทำการแก้ไขไฟล์ /etc/apache2/apache2.conf โดยใช้คำสั่ง
nano /etc/apache2/apache2.conf
ทำการเพิ่มชื่อ Server Name เข้าไปที่บรรทัดสุดท้ายของไฟล์ apache2.conf ServerName www.cfsb.com เมื่อเพิ่มเสร็จแล้วทำการบันทึกแล้วก็ออก
แก้ไขไฟล์ /etc/hosts เพื่อให้เครื่องรู้จักชื่อ domain name ที่สมมติขึ้น โดยใช้คาสั่ง
nano /etc/hosts
แก้ไขข้อความดังนี้
127.0.0.1 localhost localhost.localdomain www.cfsb.com cfsb.com
ทำการบันทึกแล้วก็ออก แล้วทำการแก้ไขไฟล์ hostname ด้วยการใช้คำสั่ง
nano /etc/hostname
แก้ใขข้อความดังนี้ด้วยการลบข้อความเก่าออก
www.cfsb.com
แก้ไขข้อความเสร็จแล้วทำการบันทึกแล้วก็ออก
ทำการเพิ่ม Hostname โดยใช้คำสั่ง
Hostname www.cfsb.com
สั่งรีสตาร์ท Network และ Apache โดยใช้คำสั่ง
/etc/init.d/networking restart
/etc/init.d/apache2 restart
ตรวจสอบการทำงานของ port 443 ว่าทำงานหรือไม่โดยการใช้คำสั่ง
Netstat –tan
ทำการทดสอบการทำงานของ SSL โดยการเข้าไปตั้งค่าของเครื่อง Client เข้าไปที่
C:\Windown\System32\driver\etc\hosts
แล้วทำการแก้ไข
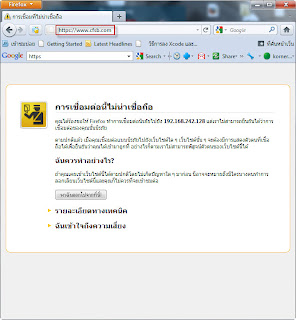
เสร็จแล้วทำการบันทึกแล้วทดสอบการเข้า web ด้วยการเรียกไปที่ URL ที่เราตั้งไว้

พอเสร็จสิ้นจากการทำ WebServer แล้วก็ไปต่อกับการติดตั้ง FTP ให้กับ Ubuntu Server


.jpg)

.jpg)


.jpg)

.jpg)

0 ความคิดเห็น:
แสดงความคิดเห็น